


As the grip of winter loosens its hold, we’re all looking forward to the gentle embrace of the spring - sun-drenched meadows, gently swaying trees, blooming flowers, and, of course, the balmy breeze that brings with it hope and makes the earth seem replenished with all its bountiful wonders. And what is spring without picnics? Picnics have always been our magical escape from the monotony of daily life, where time appears to slow down and everything seems to be okay. As we spread out our checkered blankets and wicker baskets, let the good times roll with simple treats that are easy to prepare, pack, and carry. We bring to you 5 lip-smacking recipes that are so good that everyone will reach out for more.

5 Picnic Recipes for Your Next Outing
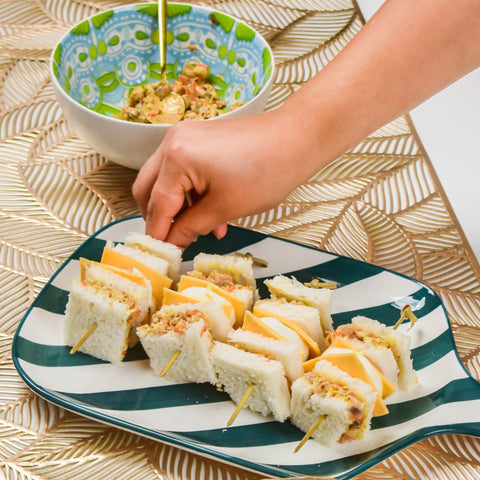
1. Sandwich Skewers
Sandwiches have always been a picnic staple. They are easy to prepare and compact, and every bite packs a lot of flavour. However, loaded sandwiches can be a hassle to pack properly and enjoy. With sauces oozing out and dripping onto your hands and tomatoes falling out with each bite, they can be a bit cumbersome, which is why these bite-sized sandwich skewers are the perfect finger food to pack for your next picnic.
Ingredients:
1. Sliced bread
2. Cheddar cheese slices
3. Ham
4. Cherry tomatoes
5. Cucumber slices
6. Lettuce leaves
7. Wooden skewers or toothpicks
Procedure:
1. Cut your bread into bite-sized pieces by using a cookie cutter. Proceed to cut your ham into small square shapes, and repeat the same for the cheese.
2. Thoroughly wash the vegetables under running water and cut them into small pieces as well.
3. Thread a piece of bread onto the wooden skewer, followed by some rolled-up cheese, ham, and veggies. Repeat the process until the skewer is filled, leaving some gaps at the top for easier handling.
4. Pack with your favourite dip, and enjoy all of the flavours and none of the mess.
The best part about these sandwich skewers is that they are completely customisable. You can experiment with different cheeses, such as smoky gouda or creamy provolone, swap out the ham for other deli meats or even thinly sliced tofu, and include seasonal veggies.
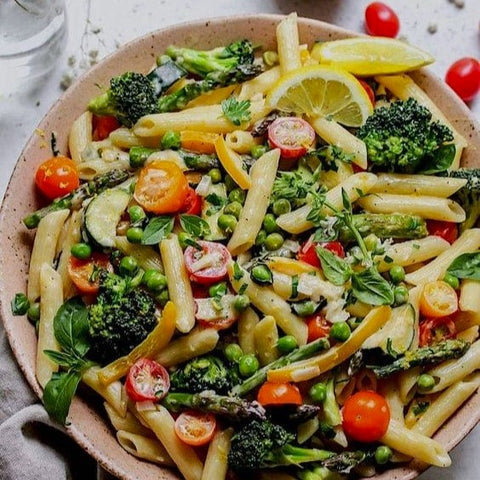
2. Pasta Salad
Salads don’t necessarily have to be boring. With just a few humble ingredients that are readily available in your pantry, you can create this tasty pasta salad that’ll be a crowd-pleaser at your next picnic. So, let’s delve into this recipe and enjoy the freshness in every bite!
Ingredients:
1. 250 g of penne pasta
2. 100 g of grilled and shredded chicken breast
3. 1 cup of cherry tomatoes
4. ½ cup of sliced black olives
5. 1 cup of broccoli florets, blanched
6. Basil/parsley
7. Salt and pepper to taste
For the dressing:
1. ¼ cup of olive oil
2. 2 tbsp of red wine vinegar
3. 2 tsp of English mustard
4. 1 clove garlic, minced
5. ½ tsp of oregano
6. Salt and pepper to taste
Procedure:
1. Cook the penne pasta in a large pot of salted boiling water until al dente.
2. Drain the pasta and transfer it to an ice bath to prevent the pasta from overcooking.
3. In the meantime, prep your vegetables. Halve your cherry tomatoes, slice your black olives, and blanch your broccoli florets in boiling water until slightly tender.
4. Transfer all the ingredients to a large mixing bowl along with the shredded chicken. Make sure the bowl has a large surface area so that tossing the components and absorbing the flavours of the dressing becomes easier.
5. In a small jar, add ¼ cup of good quality extra virgin olive oil, 2 tbsp of red wine vinegar, 2 tsp of English mustard, 1 clove of minced garlic, ½ tsp of oregano, salt and pepper. Place the lid on and shake everything to combine.
6. Pour the dressing over the rest of the components, and toss everything. Add salt and pepper to taste, and you’re done.
Make sure to pack this pasta salad in an airtight glass lunch box to preserve the freshness and keep spills at bay.
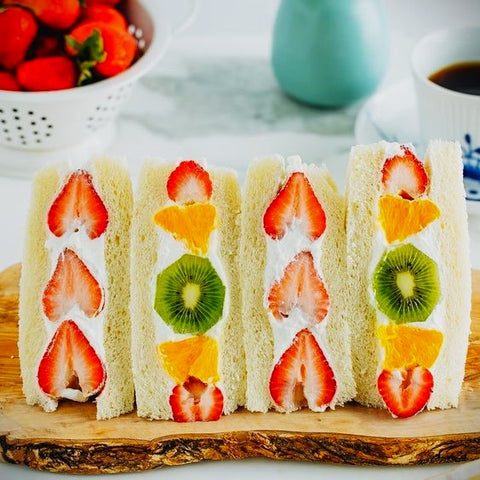
3. Japanese Fruit Sando
The Japanese fruit sando has been all the rage due to the beautiful assortment of fresh fruits that are arranged in such a way that they appear as floral shapes embedded in each cross-section. The pillowy milk bread and the fluffy whipped cream filling make these fruit sandwiches a must-have on your next outing.
Ingredients:
1. Japanese milk bread/Regular white bread
2. Strawberries
3. Kiwi
4. Mango
5. Peach
6. Whipped cream
7. Sweetened condensed milk (optional)
Procedure:
1. Wash and dry the assorted fruits. Following this, you’ll want to slice the fruits thinly and evenly.
2. Cut off the crusts from the bread for a clean presentation.
3. Take two slices of bread, and spread a generous layer of whipped cream on one side of each slice.
4. Arrange the fruits on one slice of bread, making sure to cover the surface evenly. You can create a desired pattern as you go about this process.
5. Close the sandwich by placing another slice of bread on top, making sure it is cream side down.
6. You can drizzle a bit of condensed milk on top to sweeten the deal but that’s completely optional.
There you have it—a beautiful Japanese fruit sando with a medley of colourful fruits.
4. Fruit and Cheese Platter
Fruit cheese platters are perfect for lazy and laidback outings and last-minute trips alike. Given that, there’s no actual cooking and you only need to pack a few ingredients, give this idea a try for your next picnic. You can never go wrong with this classic combo!

Ingredients:
1. Apples
2. Grapes
3. Berries
4. Pears
5. Crackers/Breadsticks
6. Brie
7. Honey
Procedure:
1. Cut all your fruits and place them inside a lunchbox. Place the brie cheese inside a small, round container.
Pro Tip: To prevent the apples and pears from browning, submerge them in a water bath (1 tbsp of lemon juice to 1 cup of water)
2. Carry your crackers and breadsticks in a separate container.
3. In an airtight jar, store your honey.
4. Arrange all the elements on a wooden platter. You can either drizzle over the honey or serve it as a dip. You can use nifty section plates to segregate the fruits, crackers, and cheese, thereby creating a neater and more visually appealing assortment.
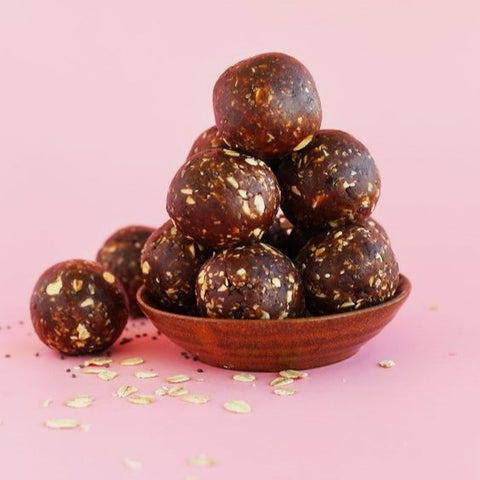
5. No-Bake Peanut Butter Bites
Let’s end our picnic on a sweet note, shall we? These no-bake peanut butter bites are super easy to make, indulgent, and take little to no time to prepare.
Ingredients:
1. Rolled oats
2. ½ cup of peanut butter
3. ¼ cup of honey
4. ¼ cup of chopped nuts (pistachios, almonds, walnuts)
5. ¼ cup of mini chocolate chips
6. 1 tsp vanilla essence
7. Pinch of sea salt
Procedure:
1. In a large bowl, combine rolled oats, peanut butter, honey, vanilla essence, choco chips, and chopped nuts in the aforementioned quantities.
2. Scoop out some of the dense mixture and roll into round, bite-sized balls.
3. Place the bites on a baking tray lined with parchment paper.
4. Chill the refrigerator for about 30 minutes or until they firm up.
5. Sprinkle some flaky sea salt on top before packing them for your picnic.
Conclusion
Picnics are all about good food, good company, sitting underneath the open sky, and feeling as free as possible. While you've got the other facets all figured out, do you have simple and mess-free picnic recipes? Maybe this was something you missed. We’ve put together a list of easy picnic recipes that take very little time to prep, but they are irresistibly good.
If you are planning a picnic, Nestasia’s picnic essentials collection is a gold mine. From insulated lunch bags to picnic blankets, you’ll find everything you need.


